环境准备
| 服务器IP | 计算机名 | 角色 |
|---|---|---|
| 192.168.1.149 | master | 主库 |
| 192.168.1.142 | slave | 从库 |
MySQL安装部署(两个机器一样的操作)
1.下载,解压,并创建软链接
#wget下载mysql5.7软件包(如果没有wget命令要yum下载哦~)
[root@master ~]# wget https://dev.mysql.com/get/Downloads/MySQL-5.7/mysql-5.7.18-linux-glibc2.5-x86_64.tar.gz
[root@master ~]# ls -lh
总用量 625M
-rw-r--r--. 1 root root 625M 3月  18 2017 mysql-5.7.18-linux-glibc2.5-x86_64.tar.gz

#解压到/usr/local目录下
[root@master ~]# tar xf mysql-5.7.18-linux-glibc2.5-x86_64.tar.gz -C /usr/local/
[root@master ~]# cd /usr/local/

#在/usr/local目录下创建软连接
[root@master  /usr/local]# ln -sv mysql-5.7.18-linux-glibc2.5-x86_64/ mysql
"mysql" -> "mysql-5.7.18-linux-glibc2.5-x86_64/"
2.新建mysql用户组和mysql用户
[root@master /usr/local]# groupadd mysql
[root@master /usr/local]# useradd -g mysql -r -s /sbin/nologin -M -d /data/mysqldata mysql
3.新建数据目录并赋予相关属组及权限
[root@master /usr/local]# chown -R mysql:mysql /usr/local/mysql/
[root@master /usr/local]# mkdir -p /data/mysqldata
[root@master /usr/local]# chmod -R 770 /data/mysqldata
[root@master /usr/local]# chown -R mysql:mysql /data/mysqldata
4.初始化mysqld,生成mysql初始密码
[root@master /usr/local]# cd /usr/local/mysql

#初始化mysqld(会提示有个报错,缺少libaio插件)
[root@master /usr/local/mysql]# ./bin/mysqld --user=mysql --basedir=/usr/local/mysql --datadir=/data/mysqldata --initialize
./bin/mysqld: error while loading shared libraries: libaio.so.1: cannot open shared object file: No such file or directory

#安装libaio
[root@master /usr/local/mysql]# yum install -y libaio

#再次初始化mysqld,日志最下方输出mysql初始密码  (hS9Le#Ki9dM
[root@master /usr/local/mysql]# ./bin/mysqld --user=mysql --basedir=/usr/local/mysql --datadir=/data/mysqldata --initialize
2020-12-24T07:39:53.161470Z 0 [Warning] TIMESTAMP with implicit DEFAULT value is deprecated. Please use --explicit_defaults_for_timestamp server option (see documentation for more details).
2020-12-24T07:39:56.359351Z 0 [Warning] InnoDB: New log files created, LSN=45790
2020-12-24T07:39:56.836233Z 0 [Warning] InnoDB: Creating foreign key constraint system tables.
2020-12-24T07:39:56.952342Z 0 [Warning] No existing UUID has been found, so we assume that this is the first time that this server has been started. Generating a new UUID: 383afe3f-45bb-11eb-a3ec-ca28bacb4f17.
2020-12-24T07:39:56.976172Z 0 [Warning] Gtid table is not ready to be used. Table 'mysql.gtid_executed' cannot be opened.
2020-12-24T07:39:56.976892Z 1 [Note] A temporary password is generated for root@localhost: (hS9Le#Ki9dM
5.配置环境变量,使用systemctl来管理mysqld服务
注意:centos7使用systemctl,如果是centos6使用下面的扩展:service来管理mysqld服务
#配置环境变量
[root@master /usr/local/mysql]# echo "PATH=$PATH:/usr/local/mysql/bin" > /etc/profile.d/mysql.sh
[root@master /usr/local/mysql]# source /etc/profile.d/mysql.sh

#编写system文件,使用systemctl来管理mysqld服务
[root@master /usr/local/mysql]# vim /usr/lib/systemd/system/mysql.service
[Unit]
Description=MySQL Server
After=network.target

[Install]
WantedBy=multi-user.target

[Service]
Type=forking
TimeoutSec=0
PermissionsStartOnly=true
ExecStart=/usr/local/mysql/bin/mysqld --defaults-file=/etc/my.cnf --daemonize
LimitNOFILE = 65535
Restart=on-failure
RestartSec=3
RestartPreventExitStatus=1
PrivateTmp=false

#重载systemctl配置
[root@master /usr/local/mysql]# systemctl daemon-reload

#配置my.cnf文件
[root@master /usr/local/mysql]# vim /etc/my.cnf
[mysqld]
user=mysql
port=3306
datadir=/data/mysqldata
basedir=/usr/local/mysql
plugin-dir=/usr/local/mysql/lib/plugin
socket=/tmp/mysql.sock
symbolic-links=0
#如果是salve从库,server_id的值要大于1 ,不能一样,反正比主库的大就行
server_id=1
[mysqld_safe]
log-error=/data/mysqldata/master.err
pid-file=/data/mysqldata/master.pid
!includedir /etc/my.cnf.d

#启动MySQL服务
[root@master /usr/local/mysql]# systemctl start mysql.service
[root@master /usr/local/mysql]# ps aux |grep mysql
mysql    10050  5.2  0.5 1190064 179824 ?      Sl   02:00   0:00 /usr/local/mysql/bin/mysqld --defaults-file=/etc/my.cnf --daemonize

systemctl enable mysql.service   ---设置开启自启动

systemctl start mysql.service      ----开启MySQL服务

systemctl stop mysql.service     -----关闭MySQL服务

systemctl restart mysql.service     -----重启MySQL服务

systemctl status mysql.service  -----查看MySQL服务状态
扩展:使用service来管理mysqld服务、配置环境变量,如果使用上面的systemctl就不用操作这一步了
[root@master /usr/local/mysql]# cp support-files/mysql.server /etc/init.d/mysqld
[root@master /usr/local/mysql]# ldconfig
[root@master /usr/local/mysql]# echo "PATH=$PATH:/usr/local/mysql/bin" > /etc/profile.d/mysql.sh
[root@master /usr/local/mysql]# source /etc/profile.d/mysql.sh
[root@master /usr/local/mysql]# chkconfig mysqld on
6.登录mysql并修改密码
#如果密码有通配符,可以用单引号括起来,或者在交互模式粘贴
[root@master /usr/local/mysql]# mysql -uroot -p'(hS9Le#Ki9dM'
mysql: [Warning] Using a password on the command line interface can be insecure.
Welcome to the MySQL monitor.  Commands end with ; or \g.
Your MySQL connection id is 3
Server version: 5.7.18

Copyright (c) 2000, 2017, Oracle and/or its affiliates. All rights reserved.

Oracle is a registered trademark of Oracle Corporation and/or its
affiliates. Other names may be trademarks of their respective
owners.

Type 'help;' or '\h' for help. Type '\c' to clear the current input statement.

mysql> set password='123456';
mysql> use mysql;
mysql> update user set host = '%' where user = 'root';
mysql> FLUSH PRIVILEGES;
mysql> exit
[root@master /usr/local/mysql]# mysql -uroot -p123456
主从复制
1.master上开启binlog日志,配置如下
[root@master ~]# vim /etc/my.cnf
[mysqld]
basedir=/usr/local/mysql
datadir=/data/mysqldata
socket=/tmp/mysql.sock
user=mysql
server_id=1
port=3306
log-bin=mysql-bin
[root@master ~]# systemctl restart mysql.service
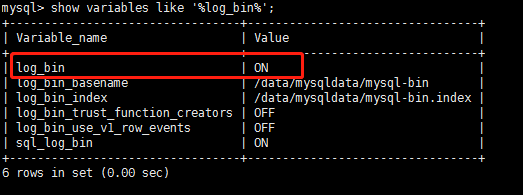
2.测试log_bin是否成功开启(ON表示开启)
[root@master ~]# mysql -uroot -p123456
mysql> show variables like '%log_bin%';
3.master的数据库中建立备份账号
backup为用户名,%表示任何远程地址,如下表示密码为1234的任何远程地址的backup都可以连接master主机
mysql> grant replication slave on *.* to 'backup'@'%' identified by '123456';
mysql> use mysql
mysql> select user,authentication_string,host from user;
+-----------+-------------------------------------------+-----------+
| user      | authentication_string                     | host      |
+-----------+-------------------------------------------+-----------+
| root      | *6BB4837EB74329105EE4568DDA7DC67ED2CA2AD9 | %         |
| mysql.sys | *THISISNOTAVALIDPASSWORDTHATCANBEUSEDHERE | localhost |
| backup    | *6BB4837EB74329105EE4568DDA7DC67ED2CA2AD9 | %         |
+-----------+-------------------------------------------+-----------+
4.master查看file 和position值
mysql> show master status\G
*************************** 1. row ***************************
             File: mysql-bin.000007
         Position: 431
     Binlog_Do_DB:
 Binlog_Ignore_DB:
Executed_Gtid_Set:
从库操作
#编辑配置文件,修改server_id值,要和主库的不一样
[root@slave ~]# vim /etc/my.cnf
[mysqld]
basedir=/usr/local/mysql
datadir=/data/mysqldata
socket=/tmp/mysql.sock
user=mysql
server_id=2
port=3306
read_only = 1

#重启mysql服务,使配置生效
[root@slave ~]# systemctl restart mysql

#进入数据库
[root@slave ~]# mysql -uroot -p123456

#停止从库
mysql> stop slave;

#配置主库的信息(要和主库查找的file 和position值一样)
mysql> change master to
    -> master_host='192.168.1.149',
    -> master_port=3306,
    -> master_user='backup',
    -> master_password='123456',
    -> master_log_file='mysql-bin.000007',
    -> master_log_pos=431;

#启动从库
mysql> start slave;

#查看主从状态,Slave_IO_Running、Slave_SQL_Running两个都为Yes则成功
mysql> show slave status \G
*************************** 1. row ***************************
               Slave_IO_State: Waiting for master to send event
                  Master_Host: 192.168.1.149
                  Master_User: backup
                  Master_Port: 3306
                Connect_Retry: 60
              Master_Log_File: mysql-bin.000007
          Read_Master_Log_Pos: 431
               Relay_Log_File: slave-relay-bin.000002
                Relay_Log_Pos: 320
        Relay_Master_Log_File: mysql-bin.000007
             Slave_IO_Running: Yes
            Slave_SQL_Running: Yes
              Replicate_Do_DB:


