环境准备
| 服务器主机名 | 外网IP | 内网IP | 备注 |
| web03 | 10.0.0.9 | 172.16.1.9 | Nginx+Tomcat服务 |
| db01 | 10.0.0.51 | 172.16.1.51 | mariadb服务 |
一、安装Tomcat服务
1.tomcat简介
tomcat服务器是一个免费的开放源代码的web应用服务器,是一个轻量级应用的服务器,在中小型系统和并发访问用户不是很多的场合下被普遍使用,是开发和调试JSP程序的首选。
2.安装java-1.8版本
[root@web03 ~]# yum install -y java-openjdk
查看是否安装成功
[root@web03 ~]# java -version
openjdk version "1.8.0_242"
OpenJDK Runtime Environment (build 1.8.0_242-b08)
OpenJDK 64-Bit Server VM (build 25.242-b08, mixed mode)
3.下载tomcat包
1.第一种下载方式,直接在终端wget下载
wget https://web.lixian.fun/data/Tomcat/apache-tomcat-8.5.51.tar.gz
2.第二种方式,下载到本地,使用xftp或者rz命令上传到web01服务器
文件下载 | 文件名称:apache-tomcat-8.5.51.tar.gz | 文件大小:9.83M |
| 下载声明:本站文件大多来自显哥哥收藏资源,仅供学习和研究使用,不得用于商业用途,如有版权问题,请联系小显哥哥哦!【显哥出品,必为精品】 | ||
| 下载地址:点击下载 | ||
4.解压Tomcat包并解压到local目录下
[root@web03 ~]# tar xf apache-tomcat-8.5.51.tar.gz -C /usr/local
[root@web03 ~]# mv /usr/local/apache-tomcat-8.5.51 /usr/local/tomcat
5.检查Tomcat是否安装成功
[root@web03 ~]# /usr/local/tomcat/bin/version.sh
Using CATALINA_BASE:   /usr/local/tomcat
Using CATALINA_HOME:   /usr/local/tomcat
Using CATALINA_TMPDIR: /usr/local/tomcat/temp
Using JRE_HOME:        /usr
Using CLASSPATH:       /usr/local/tomcat/bin/bootstrap.jar:/usr/local/tomcat/bin/tomcat-juli.jar
Server version: Apache Tomcat/8.5.51
Server built:   Feb 5 2020 22:26:25 UTC
Server number:  8.5.51.0
OS Name:        Linux
OS Version:     3.10.0-957.el7.x86_64
Architecture:   amd64
JVM Version:    1.8.0_242-b08
JVM Vendor:     Oracle Corporation
二、部署Jpress项目
1.下载Jpress源码包
wget https://gitee.com/fuhai/jpress/repository/archive/0.4.0.tar.gz
和上面一样还有本地下载方式
文件下载 | 文件名称:Jpress-0.4.0.tar.gz | 文件大小:26M |
| 下载声明:本站文件大多来自显哥哥收藏资源,仅供学习和研究使用,不得用于商业用途,如有版权问题,请联系小显哥哥哦!【显哥出品,必为精品】 | ||
| 下载地址:点击下载 | ||
2.解压并移动
[root@web03 ~]# tar zxvf 0.4.0.tar.gz
[root@web03 ~]# cp jpress/wars/jpress-web-newest.war /usr/local/tomcat/webapps/
3.启动Tomcat
[root@web03 ~]# cd /usr/local/tomcat/bin/
[root@web03 /usr/local/tomcat/bin]# ./startup.sh
Using CATALINA_BASE:   /usr/local/tomcat
Using CATALINA_HOME:   /usr/local/tomcat
Using CATALINA_TMPDIR: /usr/local/tomcat/temp
Using JRE_HOME:        /usr
Using CLASSPATH:       /usr/local/tomcat/bin/bootstrap.jar:/usr/local/tomcat/bin/tomcat-juli.jar
Tomcat started.
三、安装mariadb数据库(db01服务器)
1.安装数据库服务并启动加入开机自启
[root@db01 ~]# yum install -y mariadb-server
[root@db01 ~]# systemctl restart mariadb && systemctl enable mariadb
2.设置数据库密码,创建jpress数据库并授权
[root@db01 ~]# mysqladmin -uroot password
New password:
Confirm new password:
[root@db01 ~]# mysql -uroot -p
Enter password:
MariaDB [(none)]> create database jpress default character set utf8;
Query OK, 1 row affected (0.00 sec)

MariaDB [(none)]> grant all on jpress.* to 'jpress'@'%' identified by '123456';
Query OK, 0 rows affected (0.00 sec)

MariaDB [(none)]> flush privileges;
Query OK, 0 rows affected (0.00 sec)
四、安装JPress系统
1.浏览器访问:http://10.0.0.9:8080/jpress-web-newest
")
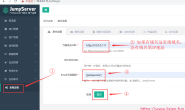
2.填写数据库连接信息
注意事项:
(1).数据库用户和密码是我们在mariadb数据库里面创建的用户和授权的密码
(2).并不是登录mysql -uroot -p 这个密码
(3).数据库主机一般要填写内网地址,服务器的外网一般是关闭的
")
3.填写网站消息,这就随便写啦
")
4.安装完成,重启Tomcat服务
")
注意事项:
(1).注意路径,要进入bin目录下再执行./shutdown.sh命令
(2).shutdown是停止服务,startup是开启服务,一停一开就是重启啦
[root@web03 /usr/local/tomcat/bin]# ./shutdown.sh
Using CATALINA_BASE:   /usr/local/tomcat
Using CATALINA_HOME:   /usr/local/tomcat
Using CATALINA_TMPDIR: /usr/local/tomcat/temp
Using JRE_HOME:        /usr
Using CLASSPATH:       /usr/local/tomcat/bin/bootstrap.jar:/usr/local/tomcat/bin/tomcat-juli.jar
[root@web03 /usr/local/tomcat/bin]# ./startup.sh
Using CATALINA_BASE:   /usr/local/tomcat
Using CATALINA_HOME:   /usr/local/tomcat
Using CATALINA_TMPDIR: /usr/local/tomcat/temp
Using JRE_HOME:        /usr
Using CLASSPATH:       /usr/local/tomcat/bin/bootstrap.jar:/usr/local/tomcat/bin/tomcat-juli.jar
Tomcat started.
5.重新刷新页面访问
")
五、安装nginx使用80端口访问
1.修改tomcat站点子目录
[root@web03 ~]# vim /usr/local/tomcat/conf/server.xml
#在文件里找到这一行
<Host name="localhost"  appBase="webapps" unpackWARs="true" autoDeploy="true">
#并在这一行下面添加一行代码
<Context path="" docBase="/usr/local/tomcat/webapps/jpress-web-newest" debug="0" reloadable="false" crossContext="true" />
")
2.重启Tomcat服务
[root@web03 ~]# cd /usr/local/tomcat/bin/
[root@web03 /usr/local/tomcat/bin]# ./shutdown.sh
Using CATALINA_BASE:   /usr/local/tomcat
Using CATALINA_HOME:   /usr/local/tomcat
Using CATALINA_TMPDIR: /usr/local/tomcat/temp
Using JRE_HOME:        /usr
Using CLASSPATH:       /usr/local/tomcat/bin/bootstrap.jar:/usr/local/tomcat/bin/tomcat-juli.jar
[root@web03 /usr/local/tomcat/bin]# ./startup.sh
Using CATALINA_BASE:   /usr/local/tomcat
Using CATALINA_HOME:   /usr/local/tomcat
Using CATALINA_TMPDIR: /usr/local/tomcat/temp
Using JRE_HOME:        /usr
Using CLASSPATH:       /usr/local/tomcat/bin/bootstrap.jar:/usr/local/tomcat/bin/tomcat-juli.jar
Tomcat started.
3.安装nginx服务
[root@web03 ~]# yum localinstall -y http://nginx.org/packages/centos/7/noarch/RPMS/nginx-release-centos-7-0.el7.ngx.noarch.rpm
[root@web03 ~]# yum install -y nginx
4.配置nginx代理并重启nginx服务
[root@web03 ~]# vim /etc/nginx/nginx.conf
:dG清空所有内容,并将下面内容写进去
user  nginx;
worker_processes  1;
events {
    worker_connections  1024;
}
http {
    include       mime.types;
    default_type  application/octet-stream;
    sendfile        on;
    keepalive_timeout  65;
    upstream tomcat_pools {
        server localhost:8080 weight=1;
    }

    server {
        listen       80;
        server_name  localhost;
        location / {
        proxy_pass http://tomcat_pools;
        proxy_set_header Host $host;
        proxy_set_header X-Forwarded-For $remote_addr;
        }
    }
}
重启nginx服务
[root@web03 ~]# systemctl restart nginx
5.使用IP访问,默认80端口
")
六、登录JPress
浏览器访问http://10.0.0.9/admin登录JPress管理系统
")
就可以进来编写博客文章啦,就这里搭建JPress就搞定啦【显哥出品,必为精品】看完记得点个赞哦
")